Writing a paper is already a long and often time-consuming process. This page presents several tips available within Microsoft Word that will allow you to spend less time tinkering with the formatting and more time focusing on the development of your ideas.
Tip 1: Clear Formatting
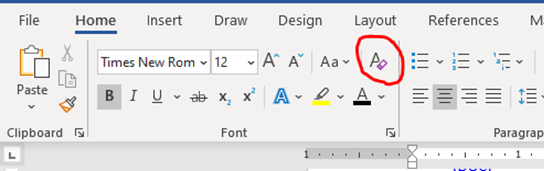
Have you ever been stuck in Word, trying to figure out why the formatting looks wrong? Well, there is a simple solution: the Clear All Formatting button. This button is available on the Home tab and has a capital “A" with a purple eraser beside it. To use this icon, highlight the area where you would like to clear the formatting, then click the icon. Your highlighted material will then return to the default settings of the document. Figure 1 shows the location of the icon in the Home tab.
Figure 1
Location of Clear All Formatting Button
Tip 2: See the Formatting Settings
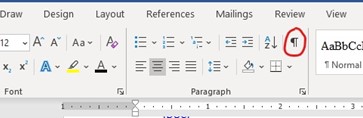
In addition to being able to completely clear the formatting, you can use the Show/Hide icon to see the otherwise invisible formatting in the document. This icon is available in the Home tab and looks like the paragraph symbol (¶). Figure 2 depicts the location of the Show/Hide button.
Figure 2
Location of Show/Hide Button
This icon is most useful when page/section breaks are used. In addition, it is helpful when editing or revising your reference list. Figure 3 shows what the document looks like when the icon is turned on.
Figure 3
Using the Show/Hide Button
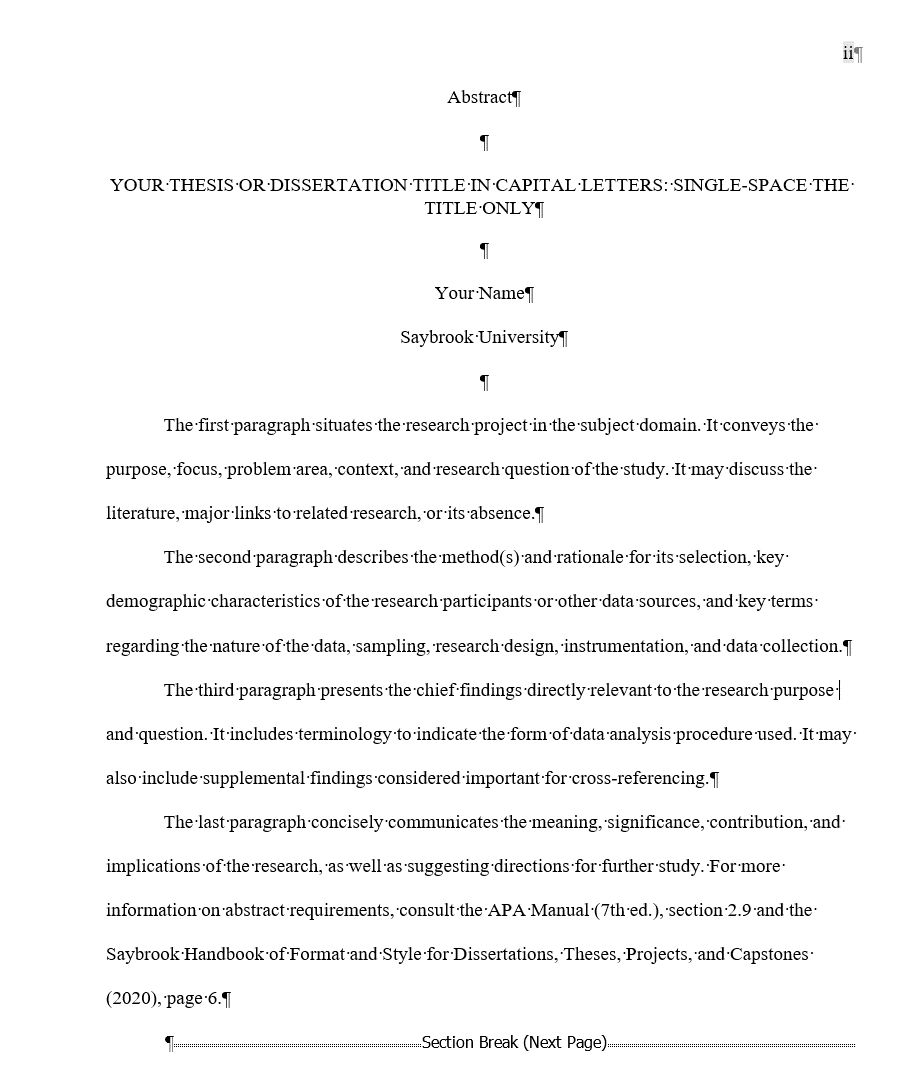
Note: With the Show/Hide icon turned on, you can see the “Section Break (Next Page)" which indicates that a section break has been inserted at this point. Additionally, you can also see paragraph symbols (¶) that show where the enter button has been pressed, forcing material onto a new line. Lastly, small dots between words indicate spaces.
Tip 3: Find & Replace
The Find and Replace function of Microsoft Word is a great tool when a minor mistake has been made throughout the paper. Rather than scrolling through your documents and hoping that you find each occurrence, you can use the find and replace function to correct each error one by one or all at once.
The button to utilize the Find and Replace function is presented on the Home tab to the right and reads “Replace" with the icon of a purple b on top and a blue c underneath and an arrow pointing from the b to the c. Figure 4 shows the location of this icon on the home tab.
Figure 4
Location of Find and Replace Icon

Once this icon has been clicked, a popup window will generate with the lines “Find what:" and “Replace with:" available for input. Enter the error that you want the document to find in the “Find what" line and the correct information that you want inserted into the document on the “Replace with" line. For example, if I am citing an author named Hutchinson, but accidentally misspelled the name without the first n (Hutchison) throughout the document, then I would enter “Hutchison" (the error) in the “Find what:" field and “Hutchinson" (the correction) in the “Replace with:" field. Figure 5 depicts the popup window that appears after selecting the Replace icon.
Figure 5
Find and Replace Pop-Up

Once that is done, you have two options:
- Replace: Selecting “Replace" will replace only the one instance highlighted by the finder. You would then select “Next" to find the next occurrence. Repeat this process until the entire document has been reviewed. This is recommended for most errors as it is best to know what changes are being made.
- Replace All: Selecting “Replace All" will replace every occurrence of the error in the document. This is recommended for errors that would take an excessive amount of time to resolve in the document. For example, if an author is used to adding two spaces between sentences, they may want to use this function to find two spaces and replace with one space throughout the entire document.
Tip 4: Opening a OneDrive Document in the Word App
In some cases, people may share a OneDrive document. This is highly beneficial for collaboration, but if you are used to using the Word app, not the online version, you may want to switch platforms. To do so, use the following instructions:
- Open the OneDrive document.
- Select the box that says “Editing."
- Select “Open in Desktop App."
When this is done, the desktop app will open with the document available. Collaborative efforts with others using the OneDrive file are not disrupted. Figure 6 depicts the location of the Editing box and the dropdown menu.
Figure 6
Location of Open in Desktop App Command
